Microgreens: The Complete Growing Guide for Beginners & Experts
Discover how to grow nutrient-dense microgreens indoors or outdoors with our step-by-step guide. Learn about the best seeds, trays, soil, lighting, harvesting techniques, and storage methods to enjoy fresh greens year-round.
START GROWING TODAYWhy Grow Microgreens? Microgreens are young vegetable greens harvested just after the first true leaves appear, typically 7 to 21 days after germination. Despite their tiny size, they pack a powerful nutritional punch—often containing higher concentrations of vitamins, minerals, and antioxidants than mature plants. They are incredibly easy to grow, require minimal space, and deliver fresh, flavorful greens year-round. Whether you are a complete beginner or an experienced gardener, microgreens offer a rewarding and fast-growing harvest.
What Are Microgreens?
Microgreens are the young seedlings of edible vegetables, herbs, and other plants. Unlike sprouts, which are grown entirely in water and consumed whole including the root, microgreens are grown in a growing medium (usually soil or a soil substitute) and harvested by cutting the stem just above the soil line. The result is a tender, flavorful green that can be used as a garnish, salad ingredient, or flavor accent in countless dishes.
Microgreens have become increasingly popular among home gardeners, chefs, and health-conscious consumers. They are essentially the intermediate stage between a sprout and a baby green. The stems and leaves are both edible, and the flavor profile varies widely by variety—from peppery radish and spicy mustard to mild broccoli and sweet pea shoots. Because they are harvested so young, microgreens retain a concentrated nutrient profile that many nutritionists consider superior to mature greens.
One of the greatest advantages of growing microgreens is their versatility. They can be grown indoors on a windowsill, in a greenhouse, or outdoors in raised beds. If you are exploring outdoor metal raised garden beds, microgreens make an excellent fast-growing crop to fill empty spaces while slower vegetables establish themselves. Their rapid growth cycle means you can experiment with different varieties and harvest fresh greens every week of the year.
Microgreens vs. Sprouts vs. Baby Greens
Understanding the difference between these three categories helps you choose the right growing method and set the right expectations for your harvest.
| Feature | Microgreens | Sprouts | Baby Greens |
|---|---|---|---|
| Growing Medium | Soil or soil substitute | Water only | Soil |
| Harvest Time | 7–21 days | 3–7 days | 21–40 days |
| Parts Consumed | Stem and leaves | Entire plant (including root) | Leaves only |
| Light Required | Yes, after germination | No | Yes |
| Flavor Intensity | Mild to intense | Mild | Mild |
This comparison highlights why microgreens are often considered the sweet spot for home growers: they are fast enough to be satisfying, require minimal equipment, and produce a more substantial harvest than sprouts without the long wait of baby greens. If you enjoy growing plants that are easy to take care of outdoors, microgreens fit perfectly into that category—they need very little attention beyond consistent watering and light.
The Best Microgreens Varieties to Grow
Not all microgreens are created equal. Some varieties are faster, easier, or more flavorful than others. Below is a breakdown of the most popular and reliable choices for home growers, organized by difficulty level.
Radish
Harvest: 7–10 days
Flavor: Peppery, spicy
One of the fastest and most forgiving microgreens. Radish seeds germinate quickly and produce vibrant green and purple stems. Ideal for first-time growers who want a quick, flavorful harvest.
Broccoli
Harvest: 10–14 days
Flavor: Mild, slightly earthy
Packed with sulforaphane, broccoli microgreens are a nutritional powerhouse. They grow reliably in most conditions and have a pleasant, mild flavor that works in salads and sandwiches.
Sunflower Shoots
Harvest: 10–14 days
Flavor: Nutty, crunchy
Sunflower shoots are a favorite for their substantial texture and nutty flavor. They require soaking before sowing but are otherwise very easy to grow and produce a generous harvest.
Pea Shoots
Harvest: 10–14 days
Flavor: Sweet, fresh
Pea shoots offer a satisfying crunch and a naturally sweet flavor. They require slightly more space and careful moisture management but reward growers with a substantial and delicious harvest.
Mustard
Harvest: 8–12 days
Flavor: Spicy, pungent
Mustard microgreens bring bold, wasabi-like heat to dishes. They grow quickly and thrive in cooler temperatures, making them a great choice for winter growing.
Beet
Harvest: 14–21 days
Flavor: Earthy, sweet
Beet microgreens are slower to germinate and require careful moisture control, but their stunning red stems and distinctive earthy flavor make them worth the effort for experienced growers.
Cilantro
Harvest: 14–21 days
Flavor: Citrusy, herbal
Cilantro microgreens have a concentrated, vibrant flavor that is highly prized in cooking. However, the seeds are slow to germinate and require patience and careful moisture management.
Red Cabbage
Harvest: 8–12 days
Flavor: Mild, slightly sweet
Red cabbage microgreens are prized for their striking purple stems and mild flavor. They add visual appeal to any dish and grow reliably with basic care.
When selecting seeds, always choose varieties labeled specifically for microgreen production. These seeds are typically sold untreated and are intended for consumption at the seedling stage. If you are also interested in growing herbs and other edibles, consider exploring local nurseries for seed recommendations tailored to your climate. For those who enjoy growing plants indoors with minimal effort, microgreens are among the best low-maintenance indoor plants for your living room or kitchen counter.
Step-by-Step Guide to Growing Microgreens
Growing microgreens is surprisingly simple, but following a proven process ensures consistent results. Below is the complete method used by experienced home growers.
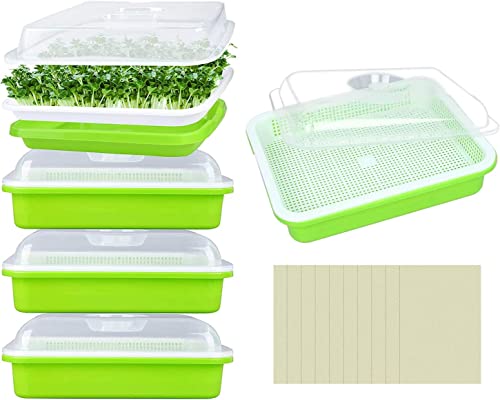
- Choose Your Container Use a shallow tray with drainage holes—standard 10x20 inch nursery trays work well. You can also repurpose clean food containers, but be sure to poke drainage holes. Avoid containers that are too deep, as microgreens have shallow root systems.
- Fill with Growing Medium Fill your tray with 1 to 1.5 inches of a lightweight seed-starting mix or coconut coir. Moisten the medium thoroughly before sowing. It should be damp but not waterlogged. Smooth the surface with your hand to create an even seedbed.
- Sow Seeds Evenly Scatter seeds evenly across the surface. Density varies by variety—radish and broccoli seeds can be sown fairly thickly, while larger seeds like peas and sunflower should be spaced slightly apart. A general rule is to sow seeds densely enough that they nearly touch but do not overlap heavily.
- Cover and Germinate Place a blackout dome or a piece of cardboard over the tray to block light. This mimics the darkness seeds experience underground and encourages strong, even germination. Keep the tray in a warm spot (65–75°F / 18–24°C) and mist lightly daily to maintain moisture.
- Reveal the Light Once seeds have germinated and the first tiny leaves appear (usually 3–5 days), remove the cover and move the tray to a bright location. A sunny windowsill or a grow light positioned 2–3 inches above the tray works well. Provide 12–16 hours of light daily for best results.
- Water from Below After germination, water from the bottom by placing the tray in a shallow pan of water and allowing the medium to absorb moisture. This prevents mold and keeps the leaves dry. Alternatively, mist gently from above with a spray bottle, but avoid soaking the foliage.
- Harvest at the Right Time Harvest when the first true leaves have developed and the stems are 2–4 inches tall. Use clean, sharp scissors or shears to cut just above the soil line. Most varieties are ready 7–21 days after sowing. Harvest in the morning when the greens are crispest.
- Store and Enjoy Rinse harvested microgreens gently in cool water and dry them in a salad spinner or on a clean towel. Store in a sealed container lined with a paper towel in the refrigerator for up to 5–7 days. Do not wash before storing if you plan to keep them for several days.
Pro Tip: For a continuous supply, start a new tray every week. This staggered planting method ensures you always have fresh microgreens ready to harvest while the next batch is growing.
Choosing the Right Growing Medium and Trays
The growing medium you choose has a direct impact on germination rates, moisture retention, and the overall health of your microgreens. Here is a breakdown of the most common options:
Seed-Starting Mix
A high-quality, sterile seed-starting mix is the most reliable choice for beginners. It is lightweight, retains moisture well, and is free from pathogens that could cause damping-off disease. Look for mixes that contain peat moss or coconut coir as the base, along with perlite or vermiculite for drainage.
Coconut Coir
Coconut coir is a sustainable alternative to peat moss. It holds moisture exceptionally well and provides good aeration for roots. It is slightly more challenging to work with than seed-starting mix because it can dry out quickly on the surface, but it is an excellent choice for environmentally conscious growers.
Hydroponic Mats
Hydroponic growing mats are made from natural fibers and are designed to be placed in a tray with a shallow layer of water. They are clean and easy to use, but they can be more prone to mold if the water level is not carefully managed. They are best suited for experienced growers who are comfortable monitoring moisture levels closely.
Vermiculite
Vermiculite is a lightweight mineral that holds moisture and nutrients well. It is often mixed with other mediums to improve water retention. Used alone, it can be difficult to manage moisture consistently, but it works well as an additive to seed-starting mixes.
When choosing trays, shallow seed trays with drainage holes are ideal. Standard 10x20 inch trays are widely available and fit most growing racks. If you are growing on a smaller scale, you can use repurposed food containers—just be sure to drill drainage holes in the bottom. For larger operations, consider an outdoor storage shed with a floor where you can set up a dedicated growing station with shelving and lighting.
Lighting Requirements for Microgreens
Light is one of the most important factors in successful microgreen production. While seeds germinate in darkness, the seedlings need bright light immediately after emergence to develop strong stems and vibrant leaves. Without adequate light, microgreens become leggy, pale, and weak.
Natural Light
A south-facing windowsill provides the best natural light for microgreens. However, even a bright windowsill may not provide enough light during winter months or in cloudy climates. If you rely on natural light, rotate your trays daily to ensure even growth and keep the plants close to the glass.
Grow Lights
For consistent results year-round, a simple fluorescent or LED grow light is the most reliable option. Position the light 2–3 inches above the tops of the plants and keep it on for 12–16 hours per day. Full-spectrum LED grow lights are energy-efficient and produce excellent results. You do not need an expensive or elaborate lighting setup—a basic shop light with full-spectrum bulbs works perfectly well.
Light Duration and Intensity
Microgreens need at least 12 hours of light per day, and 14–16 hours is ideal for most varieties. Too little light results in leggy, spindly growth, while too much light can cause the leaves to become tough or discolored. Monitor your plants and adjust the distance or duration of light as needed.
If you are growing microgreens alongside other indoor plants, you can group them together to share a lighting setup. This is especially useful if you already have a grow light for low-maintenance indoor plants for clean air. The same lighting principles apply—consistent, bright light produces healthy, productive plants.
Watering and Humidity Management
Proper watering is the most common challenge for new microgreen growers. Too little water causes stunted growth and wilting; too much water leads to mold, damping-off disease, and poor germination. The key is to maintain consistent moisture without allowing the growing medium to become waterlogged.
During Germination
Keep the growing medium consistently moist but not saturated. Mist the surface lightly with a spray bottle once or twice daily, or water from the bottom by placing the tray in a shallow pan of water. If you cover the tray with a blackout dome, you may not need to water as frequently because the cover retains humidity.
After Germination
Once the seedlings have emerged, switch to bottom watering. Place the tray in a shallow container of water and let it soak for 10–15 minutes, then remove and allow it to drain. This encourages deep root growth and keeps the foliage dry, which reduces the risk of mold. If you prefer top watering, use a fine mist sprayer and water gently to avoid dislodging the seedlings.
Air Circulation
Good air circulation is essential for preventing fungal diseases. If you are growing indoors, consider placing a small fan near your trays to keep air moving. This is especially important in humid climates or during the warmer months when humidity levels are high. A simple oscillating fan set on low speed is sufficient.
Warning: If you notice white fuzzy growth on the soil surface or on the stems, it is likely mold. Remove affected areas immediately, increase air circulation, and reduce watering frequency. Mold is usually a sign of excess moisture and poor airflow.
Harvesting and Storing Microgreens
Harvesting microgreens at the right time ensures the best flavor, texture, and nutritional content. Most varieties are ready when the first true leaves have developed and the stems are 2–4 inches tall. The exact timing varies by variety, so monitor your plants closely as they approach maturity.
How to Harvest
Use clean, sharp scissors or garden shears to cut the stems just above the soil line. Harvest in the morning after the plants have had a chance to absorb moisture overnight—this is when they are crispest and most flavorful. Work quickly and avoid crushing the stems, as this accelerates wilting.
Post-Harvest Handling
After cutting, place the harvested microgreens in a bowl of cool water and swirl gently to remove any soil or seed hulls. Lift them out of the water and dry them in a salad spinner or spread them on a clean towel and pat dry. Excess moisture accelerates spoilage, so thorough drying is important if you plan to store them.
Storage
Store microgreens in a sealed container lined with a paper towel in the refrigerator. The paper towel absorbs excess moisture and helps maintain freshness. Most varieties will keep for 5–7 days. Do not wash them before storing if you plan to keep them for several days—wash only immediately before use.
If you are growing a large quantity and want to preserve them longer, you can freeze microgreens. However, freezing changes their texture, making them suitable for smoothies and cooked dishes but not for fresh salads. For most home growers, regular small harvests with consistent storage in the refrigerator are the best approach.
Common Problems and How to Fix Them
Even experienced growers encounter occasional issues with microgreens. Here are the most common problems and their solutions:
Leggy Stems
Legginess is almost always caused by insufficient light. When seedlings do not receive enough light, they stretch toward the nearest light source, resulting in weak, spindly stems. Move your trays to a brighter location or lower your grow light closer to the plants. Also, ensure you are not leaving the blackout cover on for too long after germination.
Mold and Fungal Growth
Mold is typically a sign of excess moisture and poor air circulation. Remove the affected tray from the growing area, increase ventilation, and reduce watering frequency. Water from the bottom only, and avoid misting the foliage. If mold persists, discard the entire tray and sanitize your containers before starting a new batch.
Poor Germination
If seeds fail to germinate, the cause may be old seeds, inconsistent moisture, or temperature extremes. Always use fresh seeds from a reputable supplier, and maintain consistent moisture during the germination period. Most microgreen seeds germinate best at temperatures between 65°F and 75°F (18–24°C).
Damping-Off Disease
Damping-off causes seedlings to collapse at the soil line and is caused by fungal pathogens in overly wet conditions. To prevent damping-off, use a sterile growing medium, avoid overwatering, and ensure good air circulation. If damping-off occurs, discard the affected tray immediately—there is no cure once the disease has taken hold.
Learning to manage these challenges is part of the growing experience. If you are also maintaining an outdoor garden, many of the same principles apply. For example, proper mulch application in outdoor beds helps regulate moisture and prevent disease, much like maintaining proper moisture and airflow does for indoor microgreens.
Frequently Asked Questions About Microgreens
Bringing It All Together
Growing microgreens is one of the most rewarding and accessible gardening projects you can undertake. Whether you have a large outdoor garden or a small kitchen windowsill, these tiny greens deliver big flavor, impressive nutrition, and a fast, satisfying harvest. The process is simple: choose the right seeds, provide consistent moisture and light, and harvest at the right time. With a little practice, you will be enjoying fresh, homegrown microgreens every week of the year.
As you expand your gardening journey, microgreens can be the perfect complement to other projects—from outdoor living spaces where you entertain guests with fresh garden garnishes, to indoor growing stations that keep your kitchen supplied with greens through the winter. And if you find yourself needing help with larger outdoor tasks like mowing while you focus on your indoor microgreen garden, you might consider professional lawn care services to keep your outdoor space in shape.
Microgreens are proof that you do not need a large garden or years of experience to grow something beautiful, nutritious, and delicious. Start with one tray, learn from each harvest, and let the process inspire you to explore even more growing possibilities.