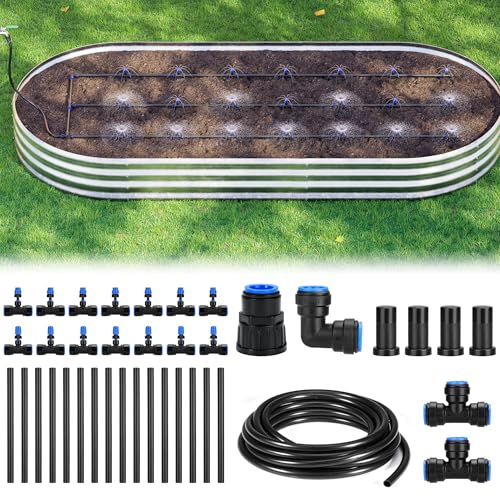
Installing Drip Irrigation for Raised Beds
Save water, reduce weeds, and grow healthier vegetables with a simple, efficient drip irrigation system. Follow our step-by-step guide to get started.
VIEW THE GUIDEWhy drip irrigation? It delivers water directly to the root zone, reducing evaporation and runoff. Perfect for raised beds, it keeps foliage dry, minimizes disease, and saves you time. Let's build a system that works for you.
Why Choose Drip Irrigation for Raised Beds?
💧 Water Efficiency
Uses up to 50% less water than sprinklers by targeting roots directly. No waste, no runoff.
🌱 Healthier Plants
Keeps leaves dry, reducing fungal diseases. Consistent moisture leads to better yields and quality.
⏳ Less Weeding
Water only where you want it. Dry pathways mean fewer weeds and less time on your knees.
Step-by-Step Installation Guide
Follow these clear steps to install a reliable drip irrigation system for your raised beds. The whole process takes about 2-3 hours for a typical setup.
1 Plan Your Layout
Measure your raised beds and sketch a layout. Decide where the main supply line will run and how many drip lines you need. For most beds, one line per row of plants works well. Ensure each plant gets an emitter near its base.
2 Gather Your Supplies
You'll need a backflow preventer, pressure regulator, filter, mainline tubing (1/2"), drip tubing (1/4"), emitters, end caps, and barbed connectors. A simple timer is a great addition for automation. Look for kits that include everything you need.
3 Connect to the Water Source
Attach the backflow preventer to your outdoor spigot, followed by the pressure regulator and filter. This ensures clean, low-pressure water flows into your system. Run the 1/2" mainline to your raised beds, securing it with stakes.
4 Install Drip Lines & Emitters
Use a hole punch to insert barbed connectors into the mainline, then attach 1/4" drip tubing. Run the tubing along your plants and install emitters (1/2 GPH or 1 GPH) at each plant. Cap the end of each drip line.
5 Test & Adjust
Turn on the water and check each emitter for proper flow. Flush the system to clear any debris. Adjust emitter placement and flow rates as needed. A timer can be added to automate watering based on your garden's needs.
6 Mulch & Maintain
Cover the tubing with mulch to protect it from UV damage and reduce evaporation. Check the system periodically for clogs or leaks. Clean the filter at the start of each season for optimal performance.
Pro Tips for Drip Irrigation Success
- Use a pressure regulator: Most drip systems operate best at 25-30 PSI. High pressure can cause emitters to fail or leak.
- Install a filter: A simple screen filter prevents clogs and keeps your system running smoothly.
- Space emitters correctly: For vegetables, place emitters 12-18 inches apart for even coverage.
- Consider a timer: Automate your watering schedule for consistent moisture, especially during hot spells.
- Flush regularly: Open the end caps and flush the system at the start and end of the season to remove sediment.
What You'll Need & Budget
A basic drip irrigation system for a 4x8 raised bed costs around $50–$80 for quality components. Complete kits are available for about $60 and include everything you need. For larger gardens, expect to spend $100+ depending on the size and number of beds.
Key components and their average prices:
- Backflow preventer: $10–$15
- Pressure regulator: $10–$20
- Filter: $8–$15
- 1/2" mainline tubing (50 ft): $15–$25
- 1/4" drip tubing (50 ft): $10–$15
- Emitters (10-pack): $8–$12
- Timer: $20–$50 (optional but recommended)